Crown Street, Wollongong, 2500


Crown Street, Wollongong, 2500
Google Workspace Migration: How to Migrate Your Email, Calendar, Contacts, & All Other Data
Melody Jaimon • September 23, 2021
Google Workspace's in-house migration tool, the Google Data Migration Service (DMS), allows you to transfer your user data, such as email, calendar, and contacts, into your new Google Workspace account from the Google Admin console. If you have a paid Google Workspace account, you can use it for free. The procedure is simple, but the time it takes to complete is dependent on the volume of data involved. The more data you have, the longer it will take to process.
This blog will help you how to efficiently migrate valuable data. Read on!
What is Google Workspace?
Google Workspace, also known as G Suite or Google Apps, is a suite of tools that allow you to collaborate with others in a more efficient way. With Google Workspace, you can create and share documents, calendars, contacts, and more. Plus, since everything is cloud-based, you can access your data from anywhere at any time!
If you’re looking for a way to improve your productivity, Google Workspace is definitely the solution for you. To learn more about Google Workspace Migration, keep on reading.
Availability
- Google Workspace is available to Google Workspace Business Standard, Business Plus, Enterprise Standard, Enterprise Plus, Education Standard, Education Plus, and legacy G Suite Business customers
- Not available to Google Workspace Essentials, Business Starter, Enterprise Essentials, Education Fundamentals, the Teaching and Learning Upgrade, Frontline, and Nonprofits, as well as legacy G Suite Basic customers
Why Use Google Workspace Migrate?
Google Workspace Migrate is especially beneficial for Google Workspace customers with a large number of seats, as it allows them to securely migrate large amounts of their organization’s data and setup on-premises infrastructure. Specifically, it provides assistance with:
- Assessment: Quickly scan source environments to help accurately plan for key project milestones and watch points
- Migration: Efficiently migrate valuable data from a variety of sources (see below)
- Track: Easily identify project progress and health with detailed aggregate and granular logging functionality
Additionally, it supports Microsoft Exchange, Microsoft SharePoint, Microsoft OneDrive, file shares, Box migrations, legacy G Suite Business and Google Workspace environments.
Important Notes Before You Start
You must be logged in as a super administrator in order to complete this task. Your source account must also be prepared (the original account from where the data will be coming from).
Data migration is available if your source account belongs into the following:
- Microsoft Exchange Server 2003, 2007, 2010, 2013, 2016, or Exchange Online (Office 365)
- 1&1 IONOS, Apple iCloud, AOL, Yahoo!, Bluehost, Zoho, and other webmail providers that use the IMAP protocol.
- Another Google Workspace account
- A personal Gmail (@gmail.com) account
Steps for Google Workspace Migration
Once you have prepared your source account, do the following migration steps:
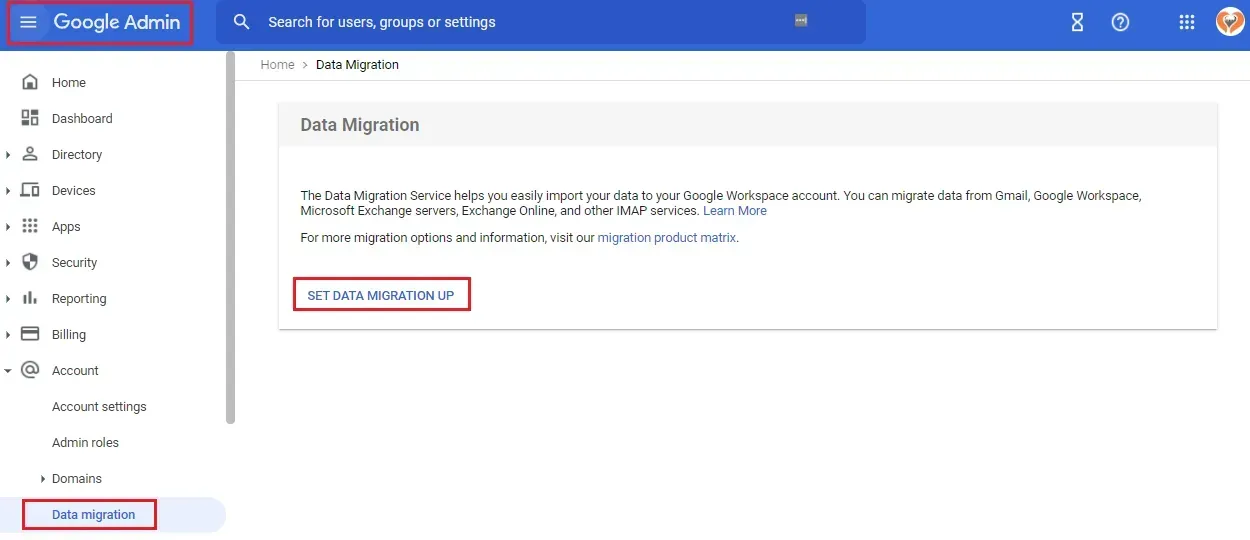
- Sign in to your Google Admin console. Take note that you must have super administrator privilege.
- Once you’re in the Admin console Home page, click on Account in the left panel and then click Data Migration.
- Click Set Data Migration Up. Then provide all the necessary info.
a. Under Migration Source, choose any of the options listed:
- Google Workspace
- Gmail
- Microsoft Exchange 2003-2016
- Microsoft Office 365
- Other IMAP Server
- I don’t know
b. Under Data Source, choose any of the options listed:
- Calendar
- Contacts
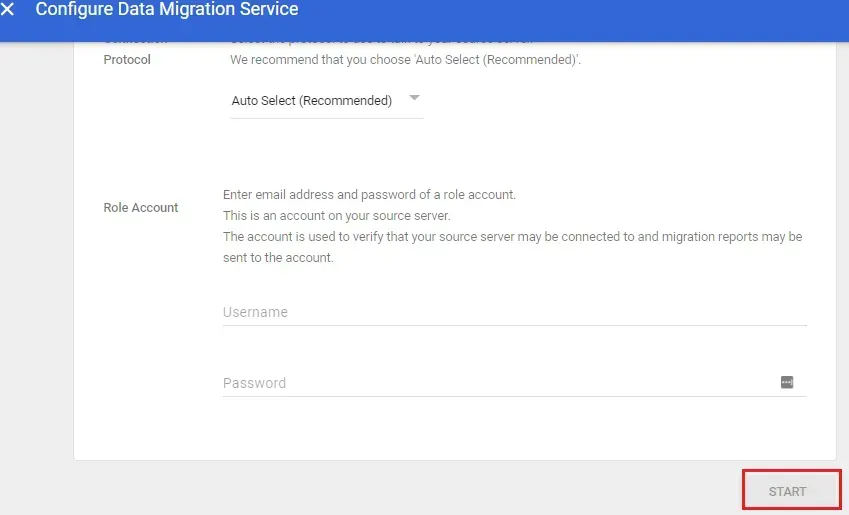
c. Under Connection Protocol, choose any of the options listed:
- Auto Select (Recommended)
- Exchange Web Services (EWS)
- IMAP
4. Under
Role Account, input the email address and password of your role account (an account on source server). Then click
Start.
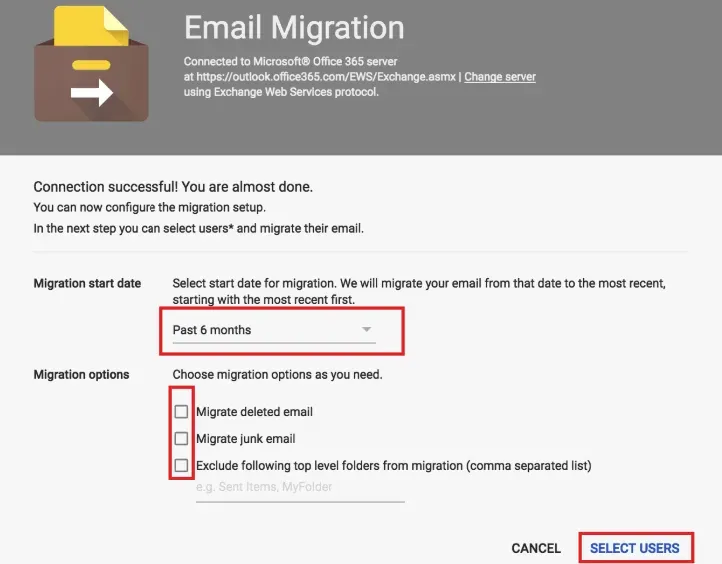
5. Under Migration Start Date, you can either accept the default option that appears or select another start date.
6. Under Migration Options, you can select all options or choose to exclude one or more of them.
7. Once you’re done selecting a Migration Start Date and choosing Migration Options, click Select Users.
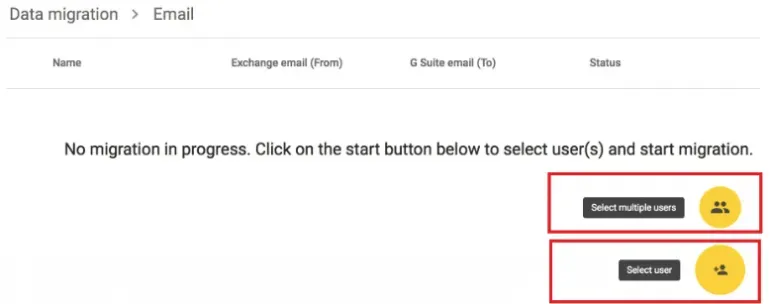
a. If you are going to migrate email for a single user, here’s what you should do:
- Click Add user.
- Enter the user’s legacy email address in the Source Email field.
- Enter the user’s new email address in the Google Workspace Email field.
- Click Start.
b. If you are going to migrate email for multiple users, here’s what you should do:
- Click Bulk upload with CSV.
- Click Attach File to upload the CSV file that contains the legacy email addresses and the new email addresses.
- Click Upload and Start Migration.
- If your file has any errors, you can choose to either update the file or ignore the errors.
If you want to exit a migration that has already been finished, click More, then click Exit migration.
Google Workspace Migration Tips
Now that you are familiar with the steps involved in migrating your email, calendar, and contacts, be sure to follow our tips below to speed up the process:
- Migrate email first. This will minimise downtime for users who are still using the old system.
- Migrate smaller batches of data at a time. This will help ensure accuracy and avoid possible errors.
- Make sure all users’ legacy addresses are accounted for in the migration file before starting the process.
- Start the migration on a weekend or during a low-traffic time to minimise potential disruptions.
- Monitor the status of the migration and request a domain-level report to troubleshoot any issues that may arise.
Conclusion
Migration can be a daunting task, but with the help of Google’s data migration service, it can be a breeze. In just a few steps, you can have all your data transferred over to your new Google account. We hope this guide was helpful and that you enjoy the many benefits of using Google Workspace!
For more topics about data migration check out the links below:
- If you want to learn more about the data migration service, click here.
- If you have any questions about running a migration, click here.
- If you want to make changes to the migration settings, you must first cancel the migration process. Learn more here.
- If you want to speed up the migration, follow this guide.
- If you want to monitor the status of a migration and request a domain-level report, follow this guide.
- If you run into issues during the migration, click here.


Love My Online Marketing has 10+ Years of working alongside businesses and helping them grow. Discuss your options for online success from website Design and Development through to Google Marketing. Book a Free 20min Discovery Call.
Do you want more traffic and business leads?
Love My Online Marketing is determined to make a business grow. Our only question is, will it be yours?


Our Services
Latest Online Marketing Posts

Boost local visibility with 11 expert tips for Google Business Profile (formerly GMB) optimisation. Learn how to rank higher and attract more customers.

Learn how to create visually appealing websites in Australia that balance creativity and functionality. Explore tips to keep designs simple yet effective. Read more.

Learn how to grow from zero on social media in 2025 using Viplikes’ tips on content, trends, and smart promotion tools. Read more to level up your game.

We collaborate with


