Crown Street, Wollongong, 2500


Crown Street, Wollongong, 2500
Configure Tax Invoices
Melody Jaimon • August 4, 2022
Tax invoices are financial documents pertaining to orders made in your online store. You can use them for internal accounting, submit them to the local tax agency, or send them to your customers. There are two types of tax invoices available in the Online Store: regular invoices for sales and cancellation invoices for refunds. Using built-in features, you can automatically or manually generate, delete, download and print invoices individually or in bulk, and change invoice numbers.
In the EU and countries such as Australia, New Zealand, and India, invoices must include tax calculations. In other countries, they may be administered voluntarily. Consult with consultants or tax authorities in your country if you are uncertain as to whether your business requires tax invoices.
Enable or Disable Tax Invoices
If you want to use the Store's built-in tax invoices feature, you can enable tax invoices. These invoices are legally compliant and have unique numbers..
To enable or disable tax invoices:
- Click eCommerce in the editor's sidebar, followed by Manage Store.
- Click Settings followed by Taxes.
- Click Set Up Tax Invoices in the section under Settings.
- On the page that appears, click EnableTaxInvoices.
- Select how you want your tax invoices generated and whether you want tax invoices to be automatically attached to order confirmation emails in the Settings section.
When you enable tax invoices for your Store, a Manage Tax Invoices dropdown option and the Tax invoices section appear on the pages of individual orders in the Store Control Panel. When you disable tax invoices, you will no longer see the list of tax invoice options.
Even if you want to have your tax invoices generated automatically, cancellation invoices must always be prepared manually. See
Manually Create Regular or Cancellation Tax Invoice for further details.
Manually Create Regular or Cancellation Tax Invoice
Regular tax invoices are generated and sent to your customers automatically when an order is placed, whereas cancellation invoices are only created and sent manually. Regardless of the settings, you can always create both types of invoices manually from your Store Control Panel.
You can adjust the default settings for your regular tax invoices and choose when they should be created automatically, or you can create and send them manually. See
Enable or Disable Tax Invoices for further details.
Regular tax invoices cannot be modified after they have been prepared. If you desire to cancel or refund a purchase, you must create a special cancellation (refund) invoice. Cancellation tax invoices are generated for all of the items in your order. The negative totals and subtotals distinguish cancellation from regular tax invoices. Cancellation invoices have their own unique number that does not match the number on the order's regular tax invoice.
To generate a regular or cancellation tax invoice for an order, follow these steps:
- Click eCommerce in the editor's sidebar, followed by ManageStore.
- Click MySales followed by Orders.
- Select the order for which you need to generate a tax invoice.
- Select CreateTaxInvoice from the drop-down menu of ManageTaxInvoices.
- On the page that opens, select Regular(Sale) or Cancellation (Refund).
- Select Create Tax invoice or Create Cancellation Tax Invoice.
You can also generate regular tax invoices when manually placing an order via
MySales > EditOrders. Check the
Generatetaxinvoiceuponorderplacement
to accomplish this.
All invoices made for a specific order, including those auto-generated ones, are accessible under the Tax invoices section of that order's website. You can either print or download the invoice as a.pdf file to deliver to your clients. If necessary, you can always erase invoices; see
Delete Tax Invoices.
Delete Tax Invoices
If you accidentally created a tax invoice for an order, you can delete it..
To delete a tax invoice, follow these steps:
- Click eCommerce in the editor's sidebar, followed by ManageStore.
- Click MySales followed by Orders.
- Click the order for which an invoice is to be deleted.
- In the Tax invoices section, click..., then click Delete.
- In the dialog box, click Yes.
The tax invoice will be permanently deleted. If you remove the order, all of its tax invoices are also deleted.
If you want to keep the numeration of your tax invoices consistent, you may need to make changes to the future tax invoice number. See
Customize the Tax Invoice Number for more information.
Download and Print Tax Invoices
Individual tax bills can be printed or downloaded as.pdf files. Additionally, you can obtain PDF invoices in bulk.
To print or download tax invoices for a specific order:
- Click eCommerce in the editor's sidebar, followed by Manage Store.
- Click MySales followed by Orders.
- Select the order.
- Click Download PDF or Print under the Tax Invoices section.
Regular tax invoices are also attached to New Order Placed email notifications (if you enabled them for your Store in
Settings > Notifications and your tax invoices are automatically generated).
Bulk Download
You can request an archive of all tax invoices available in your store for a specific time period (for example, to present to the tax office when it is due in your country).
To download several tax invoices:
- Click eCommerce in the editor's sidebar, followed by Manage Store.
- Click Settings followed by Taxes.
- Select the Tax Invoices area.
- To expand the Get all tax invoices at once section, click its heading.
- Configure the period for which you wish to obtain tax bills.
- Click Get Tax Invoices.
The email address associated with your Store account will receive a message including a link to the tax invoice archive, which is accessible for download in.zip format (the invoices are in .pdf). The validity of the connection is 48 hours.
Customise the Tax Invoice Number
You can edit the numbers on your tax invoices to accommodate your business's procedures and your country’s legislation (for example, add a special code in the prefix). If you have erased an invoice or made invoices outside of your Store, you can also need to change the future tax invoice number.
Your Store's tax invoice numbers are independent of the order numbers. Instead, tax invoices use ascending sequential numbering. Each tax invoice number immediately succeeds the previous one.The number begins with "1" by default, but you can personalise the tax invoice numbers and set the number for future invoices to any positive integer.
Tax invoices can have any prefix or suffix added to the numeric part. You can also specify the minimum number of digits in your invoice (zeros will be added in the beginning if the actual number is smaller). Keep the default settings if you want the tax invoices in your store to begin with the number 1.
To set up your upcoming invoice number, follow these steps:
- Click eCommerce in the editor's sidebar, followed by Manage Store.
- Click Settings followed by Taxes.
- Select the Tax Invoices section.
- Scroll down to the Settings section.
- Click the section labeled Nexttaxinvoicenumber.
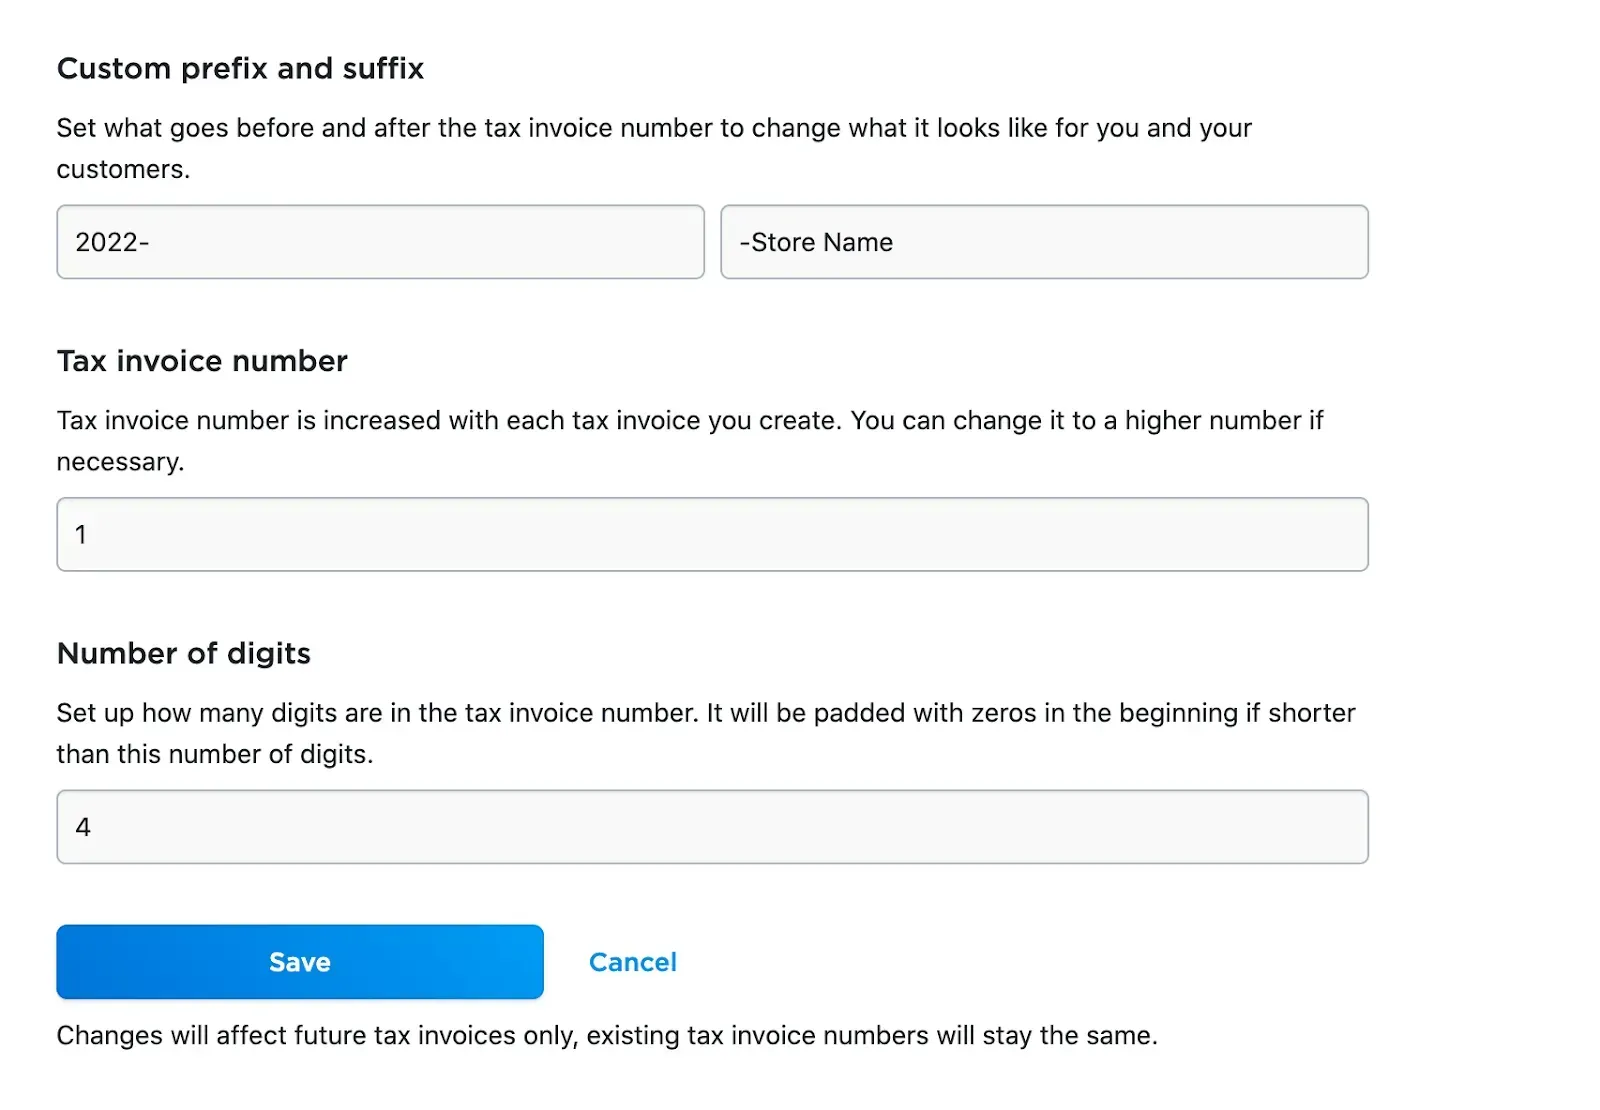
- Enter the prefix and suffix (if necessary), the tax invoice number (the number of the next invoice to be produced in your store), and the minimum number of digits for your invoice in the menu that appears.
- Tap Save.
Changes impact only future tax invoices; existing tax invoice numbers remain unchanged.
Examples
Example 1. You accidentally created invoice #123. Even if you immediately delete it (along with the order), the next invoice in your store will be #124. To keep the invoice number sequence intact, enter "123" as the tax invoice number in the Nexttaxinvoicenumber section. As a result, the next invoice generated in your store will be #123.
Example 2: Every year, you keep the following invoice numeration in your store: invoice year-number-name of your store. You want to reset the numeration when 2022 begins. You also know that you typically have 1000+ invoices per year and want your first invoice to be "0001”. As a result, the future tax invoice number will be "2022-0001-Store Name," where Store Name is the name of your business.
Here's how your menu settings should look:


Love My Online Marketing has 10+ Years of working alongside businesses and helping them grow. Discuss your options for online success from website Design and Development through to Google Marketing. Book a Free 20min Discovery Call.
Do you want more traffic and business leads?
Love My Online Marketing is determined to make a business grow. Our only question is, will it be yours?


Our Services

Latest Online Marketing Posts

Boost local visibility with 11 expert tips for Google Business Profile (formerly GMB) optimisation. Learn how to rank higher and attract more customers.
Learn how to create visually appealing websites in Australia that balance creativity and functionality. Explore tips to keep designs simple yet effective. Read more.

Learn how to grow from zero on social media in 2025 using Viplikes’ tips on content, trends, and smart promotion tools. Read more to level up your game.

We collaborate with


